This product has been retired. The contents of this page are provided for reference only.
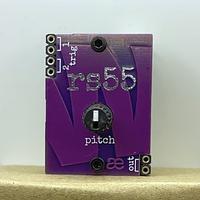
RS55 (prototype kit) [AE Modular µ-module]
Sold by wonkystuff
$23.68
No tax for United States [change]
This product is no longer available.
I just found these languishing at the back of my 'scrap' box — first prototypes of the clone of the Boss DR55 'Rimshot' voice. Unfortunately I made an error when calculating capacitor values, so these are pitched lower than the production version — but could still be useful!
As an experiment, I'm offering these as a kit; nothing too complex, in fact it's so obvious (!) that there really aren't any assembly instructions apart from those listed in the description below.
inputs
- Trigger 1 & 2: A trigger pulse at input 1 or 2 will cause the rs55 to do its thing; if two pulses arrive simultaneously then there is an accented effect which can be quite effective!
Duplication of trigger inputs are intended to be used as local 'multiples' (for example to allow the same trigger signal to be relayed to other drum voice modules).
Tested with TRIQ164; Euclid Grid; rbss
Outputs
- Audio output: The same audio output signal is present at all 4 outputs, allowing it to be sent to multiple destinations.
Assembly Instructions
- Solder 6-pin power connector to underside of board (opposite side to the one with the components on) MAKING SURE that the connector lies completely flush to the PCB;
- Squeeze the tabs slightly on the potentiometer and insert it into the component-side of the PCB (don't solder it yet);
- Assemble the two brass uprights into the front panel using two of the M2 screws;
- Assemble the panel onto the PCB, making sure that the small metal collar of the potentiometer fits through the hole (the brass mounting pillars will both meet the PCB) - tighten the remaining screws to make a single assembly;
- Solder the potentiometer (including the tabs);
- Using a piece of tape (or blu-tak), position a four-way header in the correct places on the board, slightly off the PCB so that the connector rests against the edge of the panel. Solder one pin, review the positioning and, if all looks nicely aligned, solder the remaining 3 pins. Repeat for the other header.
- That's it, you're done!
Check the photos, or message us if you're not sure!
Links to code and documentation
Documentation (wonkystuff.net)
Product HS Code: 92099400
Shipping policy
Unfortunately it is not possible to link product stock levels with those from the regular wonkystuff shop, so there might be times when items are not currently in stock. In these cases I will contact you to update the expected shipping times (which will need to include the manufacturing time of course).
We aim to get thiings shipped out as quickly as possible; please feel free to contact me if you think things are taking too long!
Here are some extras that might be useful for your project!
The seller
Welcome to wonkystuff!
We make modules for the AE Modular system by Tangible Waves, and this is our storefront for EU customers (Non-EU customers, can use the shop over at https://wonkystuff.co.uk/)
Please keep order totals under €150 as that way VAT is calculated for you. Exceeding this limit will mean that import duty/VAT will be charged to the recipient by the local postal service. If your order exceeds €150, then please consider splitting it or ordering direct from wonkystuff (which reduces our costs!)
Thank You!
![Main product image for RS55 (prototype kit) [AE Modular µ-module]](https://lectronz-images.b-cdn.net/lectronz/active_storage/representations/proxy/eyJfcmFpbHMiOnsiZGF0YSI6NzI3MCwicHVyIjoiYmxvYl9pZCJ9fQ==--c3ddaf08e6cd4c527951348dd6ec6493be518f9b/eyJfcmFpbHMiOnsiZGF0YSI6eyJmb3JtYXQiOiJqcGVnIiwicmVzaXplX3RvX2xpbWl0IjpbOTYwLDY0MF0sInNhdmVyIjp7InN0cmlwIjp0cnVlfX0sInB1ciI6InZhcmlhdGlvbiJ9fQ==--4e27bac8cdfb621fb828f6a3a5982fe1a423b516/IMG_1891%20Large.jpeg)
![Product image 2 for RS55 (prototype kit) [AE Modular µ-module]](https://lectronz-images.b-cdn.net/lectronz/active_storage/representations/proxy/eyJfcmFpbHMiOnsiZGF0YSI6NzI3NCwicHVyIjoiYmxvYl9pZCJ9fQ==--b11bf3f2a0888bbc556e8913503b16b75be86e22/eyJfcmFpbHMiOnsiZGF0YSI6eyJmb3JtYXQiOiJqcGVnIiwicmVzaXplX3RvX2xpbWl0IjpbOTYwLDY0MF0sInNhdmVyIjp7InN0cmlwIjp0cnVlfX0sInB1ciI6InZhcmlhdGlvbiJ9fQ==--4e27bac8cdfb621fb828f6a3a5982fe1a423b516/IMG_1892%20Large.jpeg)
![Product image 3 for RS55 (prototype kit) [AE Modular µ-module]](https://lectronz-images.b-cdn.net/lectronz/active_storage/representations/proxy/eyJfcmFpbHMiOnsiZGF0YSI6NzI3OCwicHVyIjoiYmxvYl9pZCJ9fQ==--b7fad57bcaaf63a6972d07dd90005efbc98d45e3/eyJfcmFpbHMiOnsiZGF0YSI6eyJmb3JtYXQiOiJqcGVnIiwicmVzaXplX3RvX2xpbWl0IjpbOTYwLDY0MF0sInNhdmVyIjp7InN0cmlwIjp0cnVlfX0sInB1ciI6InZhcmlhdGlvbiJ9fQ==--4e27bac8cdfb621fb828f6a3a5982fe1a423b516/IMG_1893%20Large.jpeg)
![Product image 4 for RS55 (prototype kit) [AE Modular µ-module]](https://lectronz-images.b-cdn.net/lectronz/active_storage/representations/proxy/eyJfcmFpbHMiOnsiZGF0YSI6NzI4MiwicHVyIjoiYmxvYl9pZCJ9fQ==--43d7b0f718d8c0e4412778e4ca093221c9ba651e/eyJfcmFpbHMiOnsiZGF0YSI6eyJmb3JtYXQiOiJqcGVnIiwicmVzaXplX3RvX2xpbWl0IjpbOTYwLDY0MF0sInNhdmVyIjp7InN0cmlwIjp0cnVlfX0sInB1ciI6InZhcmlhdGlvbiJ9fQ==--4e27bac8cdfb621fb828f6a3a5982fe1a423b516/IMG_1894%20Large.jpeg)
![Product image 5 for RS55 (prototype kit) [AE Modular µ-module]](https://lectronz-images.b-cdn.net/lectronz/active_storage/representations/proxy/eyJfcmFpbHMiOnsiZGF0YSI6NzI4NiwicHVyIjoiYmxvYl9pZCJ9fQ==--7bb6507d264da5cfaafac1d0721920cfe290e674/eyJfcmFpbHMiOnsiZGF0YSI6eyJmb3JtYXQiOiJqcGVnIiwicmVzaXplX3RvX2xpbWl0IjpbOTYwLDY0MF0sInNhdmVyIjp7InN0cmlwIjp0cnVlfX0sInB1ciI6InZhcmlhdGlvbiJ9fQ==--4e27bac8cdfb621fb828f6a3a5982fe1a423b516/IMG_1895%20Large.jpeg)
![Product image 6 for RS55 (prototype kit) [AE Modular µ-module]](https://lectronz-images.b-cdn.net/lectronz/active_storage/representations/proxy/eyJfcmFpbHMiOnsiZGF0YSI6NzI5MCwicHVyIjoiYmxvYl9pZCJ9fQ==--7ae7ff947ec0cddf58967fd2ed8b1422f1ddb215/eyJfcmFpbHMiOnsiZGF0YSI6eyJmb3JtYXQiOiJqcGVnIiwicmVzaXplX3RvX2xpbWl0IjpbOTYwLDY0MF0sInNhdmVyIjp7InN0cmlwIjp0cnVlfX0sInB1ciI6InZhcmlhdGlvbiJ9fQ==--4e27bac8cdfb621fb828f6a3a5982fe1a423b516/IMG_1897%20Large.jpeg)
![Product image 7 for RS55 (prototype kit) [AE Modular µ-module]](https://lectronz-images.b-cdn.net/lectronz/active_storage/representations/proxy/eyJfcmFpbHMiOnsiZGF0YSI6NzI5NCwicHVyIjoiYmxvYl9pZCJ9fQ==--4af4d9add68e65327dda8243b1af0f32622f6af1/eyJfcmFpbHMiOnsiZGF0YSI6eyJmb3JtYXQiOiJqcGVnIiwicmVzaXplX3RvX2xpbWl0IjpbOTYwLDY0MF0sInNhdmVyIjp7InN0cmlwIjp0cnVlfX0sInB1ciI6InZhcmlhdGlvbiJ9fQ==--4e27bac8cdfb621fb828f6a3a5982fe1a423b516/IMG_1898%20Large.jpeg)

