W.O.P.R. Missile Launch Code Display Kit - HAXORZ
Sold by Unexpected Maker
$49.00
No tax for United States [change]
New HAXORZ II EDITION!
This is a newly updated version of the W.O.P.R kit, including the following new features:
A modern take on the W.O.P.R. missile launch sequence from the 1983 movie War Games.
I love the movie War Games - It was one of my first glimpses into computers and how they could be connected, and I thought that the W.O.P.R. computer in the movie was amazing, with all of it's flashing LEDs and computer noises.

But most of all, I loved the intense missile unlock sequence in the movie. W.O.P.R. guessing the unlock code, while Matthew Broderick tries to teach it that no one ever wins. It was exciting and I always wanted to make a "replica" of that unlock sequence... and I finally did!
It's a very versatile display. It can be programmed to display any messages, and because it runs off a TinyPICO + Audio Shield, it can play sounds/music, has WiFi and BT so it's a fully-featured IoT device, with a sexy display made from 12x 14 segment digits.
What are the 5 numbers?
The 5 Acrylic numbers at the top right are DEFCON numbers, used in the project (and in the movie) to show the current defense condition, 5 being at peace and 1 being at war. These numbers are lit up by the RGB LEDs that come pre-assembled on the PCB.

What's in the kit?
The kit comes with everything you need to build your W.O.P.R display. A few components come pre-assembled on the PCB for you as they have plastic cases and can't be hand soldered easily.
- PCB (With RGB LEDs and 1x 100nF capacitor pre-assembled)
- 6x Red 2 digit 14 segment displays
- 6x 10k 0805 resistors
- 3x HT16K33 LED drivers
- 3x 100nF 0805 capacitors
- 2x 47k 0805 resistors
- 2x Schottky diodes
- 2x Large tactile buttons
- 2x Small tactile button
- 1x Acrylic front plate
- 1x 3D printed back
- 4x mounting screws and nuts
- 5x Acrylic defcon number inserts
- 4x 10 pin female headers
Optional:
- 1x Audio Shield
- 1x TinyPICO (USB-C) or TinyS2 or TinyS3
Is there any code?
Yup! I have put together some code that implements a few different features, including an NTP clock, a movie unlock sequence simulation, and a "display whatever message" random unlock sequence.
The included features are selectable via a menu on the display (right button is menu, left button start) so feel free to add more features to it!
Download the code and flash it to your TinyPICO via the Arduino IDE. The code is released as open source under the MIT and is available via the link below.
What else can this display be used for?
Well, it's a fancy IoT display, so it can be used for all sorts of "connected" tasks, like a schedule/task reminder system, an online messaging system, social media counter, pager?
If you think up a cool use for the display, please let me know!
Do I have to use a TinyPICO?
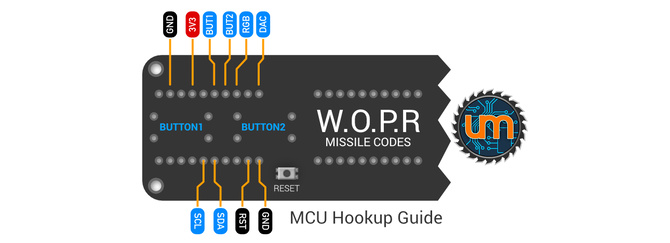
No, you don't have to use a TinyPICO for the display, you can wire in a different ESP32 micro-controller board if you want, but it's not going to look as neat :) Here's a hookup guide for the pins you need to connect:

The Arduino code linked to below is written to run specifically on an ESP32, utilising ESP32 only functionality like RMT for the RGB LEDs. If you'd like to use a non-ESP32, you'll need to hack the code yourself to get it working.
Find out more about what I do
Check out my youtube channel to see videos about the projects I work on!
Links to code and documentation
Shipping policy
All products purchased on this store ship directly from me here in Melbourne, Australia.
Orders are processed daily and usually go out the same day they are paid for - allowing for time zone differences of course.
Finally, postage rates suck, sorry :( I'm embarrassed by how much it costs to ship items overseas since COVID, and I do my best to improve rates where I can.
Postage delivery times, if stated, are based on current expectations from Australia Post and may vary.
Please keep in mind that there are still occasional postage delays, including flights out of Australia and inbound customs processing into many countries.
The seller
I design and manufacture my own range of electronics products, mostly around micro-controllers, IOT and products that help with manufacturing.
I'm based in Melbourne, Australia, and all products are made by me and shipped from here to hobbyists, makers, companies and resellers around the world.


